Please go through the following articles to learn more about Storage Account.
- Azure Storage – Basics
- Azure Resource Manage Template: Create A Storage Account Using Blank Template
- Create a Storage Account and learn how to access It Programmatically
- Azure Storage – Creating Blob Container Using Storage Client Library
- Azure Storage Account Why Two Access Keys
In the above articles, we have learnt how to create a Storage Account and perform a few basic operations to the Storage Services. We have also learnt how to create a ConnetionString that could be used to connect to the Storage Account using Microsoft .NET Client Storage Library.
In this article, we will learn the following.
- Create a Folder named ‘jpegs’ in an existing Blob Container named ‘images’
- Upload an Image to the ‘jpegs’ folder.
Create a Folder named ‘jpegs’ in an existing Blob Container named ‘images’
Navigate to the ‘images’ container as shown below. Currently, there are no items in this container.

Note: Currently, there is no facility in the Azure Management portal for creating a Folder. Below are the steps required for creating the Folder.
- Get the reference of the Blob Container
- Get the reference of Directory using the GetDirectoryReference function of the CloudBlobContainer
Below is the code for creating a Directory.
CloudBlobDirectory directory = container.GetDirectoryReference(strDirectoryName);
Please note that you cannot create a Directory alone in the Container using Storage Client Library. You need to accompany it along with a Blob. Let’s see how to do that now.
Upload an Image (block blob) to the ‘jpegs’ folder
Below are the steps required for creating the Folder.
- Get the reference of the CloudBlobDirectory
- Ge the reference of the CloudBlockBlob using the GetBlockBlobReference function of the CloudBlobDirectory
Below is the code for creating the Blob (image).
CloudBlockBlob blockblob = directory.GetBlockBlobReference(strFileName + “.jpg”);
blockblob.UploadFromFile(“d:\\Cloud-Azure.jpg”);
There are multiple ways of uploading the files to the blob. The above example directory reads the file from the hard disk and uploads the same to the Blob.
Execute the application by pressing Ctrl + F5.
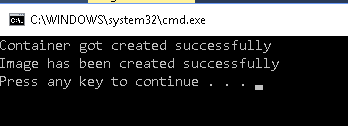
As per the above screen capture the image got uploaded successfully. Let’s navigate to the Storage Account to review the changes.
Clicking on the Container took me to the following blade where all the items of the Container are listed as shown below.

Click on the jpegs folder to view the content of this folder.
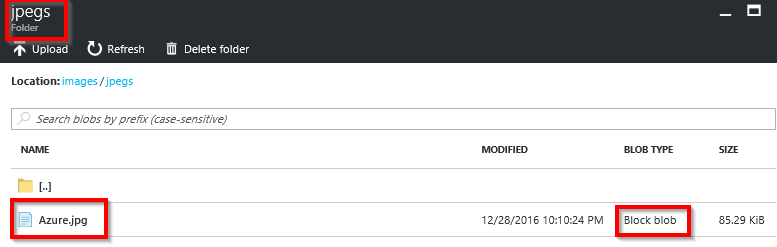
As shown above the image got uploaded successfully. Click on the Azure.jpg blob to navigate to it’s properties shown below.

You can do the following actions from the Blob Properties blade.
- Download – Clicking on the Download button will download the file to the local hard disk
- Delete – Clicking on the Delete button will delete the file from the Blob Storage
- View the image – Copy the path of the blob and view the same in a browser as shown below.

Please note that I’m able to browse the image URL in the browser as I set the permission of the Container to allow access to all it’s contents to public using the following line
container.SetPermissions(new BlobContainerPermissions { PublicAccess = BlobContainerPublicAccessType.Container });
Below is the complete code.
namespace StorageAccount
{
class Program
{
static void Main(string[] args)
{
//Get the reference of the Storage Account
CloudStorageAccount storageaccount = CloudStorageAccount.Parse(ConfigurationManager.AppSettings[“ConnectionString”].ToString());//Get the reference of the Storage Blob
CloudBlobClient client = storageaccount.CreateCloudBlobClient();
/*Get the reference of the Container. The GetConainerReference doesn’t make a request to the Blob Storage but the Create() & CreateIfNotExists() method does. The method CreateIfNotExists() could be use whether the Container exists or not*/CloudBlobContainer container = client.GetContainerReference(“images”); container.CreateIfNotExists();
container.SetPermissions(new BlobContainerPermissions { PublicAccess = BlobContainerPublicAccessType.Container });
Console.WriteLine(“Container got created successfully”);
CreateBlockBlob(container, “jpegs”, “Azure”);
Console.WriteLine(“Image has been created successfully”);}
static void CreateBlockBlob(CloudBlobContainer container,string strDirectoryName,string strFileName)
{
CloudBlobDirectory directory = container.GetDirectoryReference(strDirectoryName);
CloudBlockBlob blockblob = directory.GetBlockBlobReference(strFileName + “.jpg”);
blockblob.UploadFromFile(“d:\\Cloud-Azure.jpg”);
}
}
}
Summary: We have learnt the following in the Article.
- Create a Directory
- Create a File into a Directory
- Delete and Download the Block Blob from Azure Management portal
- View the properties
- Programmatically set the Container permissions to public access.
Hope you enjoyed reading the article. Your feedback is appreciated.
Do you like this article? If you want to get more updates about these kind of articles, you can join my Learning Groups
Discover more from Praveen Kumar Sreeram's Blog
Subscribe to get the latest posts sent to your email.

2 comments