 Posted by
 Overview
Imaging a scenario where your (Python FastAPI or any technology) app on Azure App Service just went down due to one of the actions that by a team mate where the person has rotated the SQL password as part of a security review, and nobody updated the connection string sitting in App Settings. The app could not authenticate, connections failed. Relying on passwords embedded in application configuration is not at a good practice for production grade apps. Whether a password is rotated, accidentally exposed, or entered incorrectly, applications become vulnerable to outages and operational overhead.
That’s exactly where Managed Identities come into picture for rescue. Mis allow us to authenticate databases without any passwords.
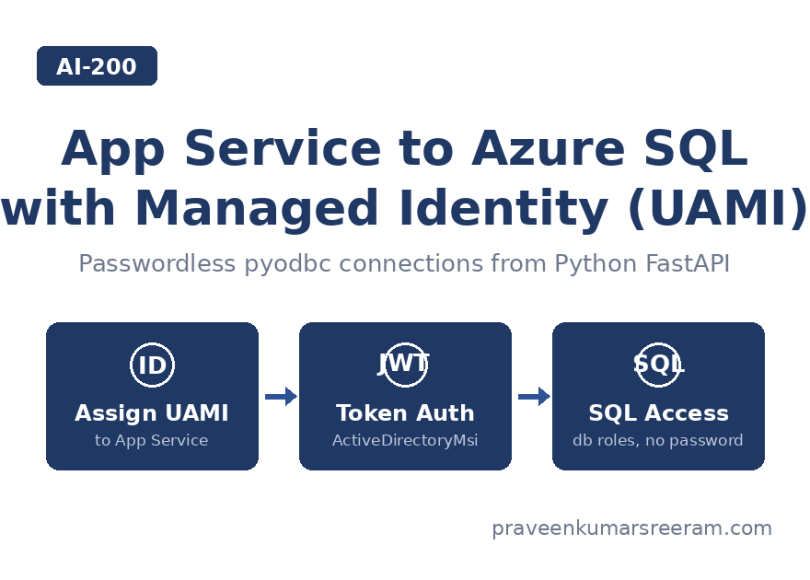
In this article, we will connect an Azure App Service (running a Python FastAPI app with pyodbc) to Azure SQL Database using a User-Assigned Managed Identity (UAMI) – no password, no secret, no connection string leak to worry about.
What Is a User-Assigned Managed Identity?
A managed identity is an identity in Microsoft Entra ID that Azure manages for you. Azure handles the credential lifecycle – creation, rotation, and protection – and your application simply requests tokens at runtime.
Managed identities come in two flavors:
- System-assigned: created as part of an Azure resource (like an App Service) and tied to its lifecycle. Delete the resource, and the identity is gone.
- User-assigned (UAMI): a standalone Azure resource that you create independently and attach to one or more resources. It survives resource deletion and can be shared across multiple App Services, Function Apps, or Container Apps.
For real-world production grade applications, the UAMI is often the better choice: you grant database permissions to the identity once, and every service that carries that identity inherits the access. When you tear down and redeploy an App Service, the SQL permissions do not need to be recreated.
The Old Way vs. The New Way
The Old Way: SQL Authentication
Driver={ODBC Driver 18 for SQL Server};Server=tcp:contoso-sql.database.windows.net,1433;Database=contosodb;UID=sqladmin;PWD=SuperSecret;Encrypt=yes;
A username and password sit in plain sight inside App Settings, deployment scripts, and sometimes source control. Anyone with read access to the App Service configuration can lift the credentials and connect to the database from anywhere.
The New Way: UAMI Authentication
Driver={ODBC Driver 18 for SQL Server};Server=tcp:contoso-sql.database.windows.net,1433;Database=contosodb;Authentication=ActiveDirectoryMsi;UID=<uami-client-id>;Encrypt=yes;
No password anywhere. The ODBC driver requests a token from the App Service identity endpoint at connection time, and Azure validates it against Entra ID. Note that UID now carries the client ID of the UAMI – not a username. This is the single most important syntax detail in this article, and we will come back to it.
Step 1: Create the UAMI and Assign It to App Service
First, create the identity and attach it to your App Service. All commands below use Windows CMD syntax.
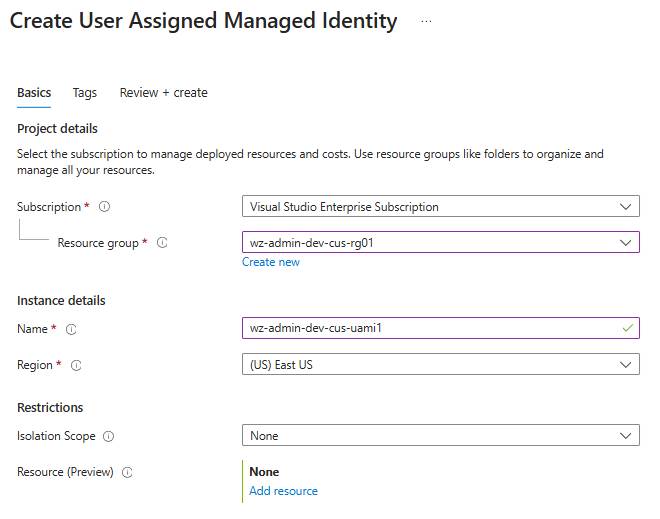
As shown in the above screenshot, please create a User Assigned Managed Identity. Let’s now assign the identity to the App Service:

Once you click on Add button in the above screenshot, you will see all the Managed Identity resources. Choose the appropriate one and assign the same to the App Service.
Step 2: Set the Microsoft Entra Admin on the SQL Server
In order to get the User Assigned Managed Identity authentication work for the SQL Database, you need to first enable Microsoft Entra authentication for which you need to assign an Entra user as an Admin as shown below.
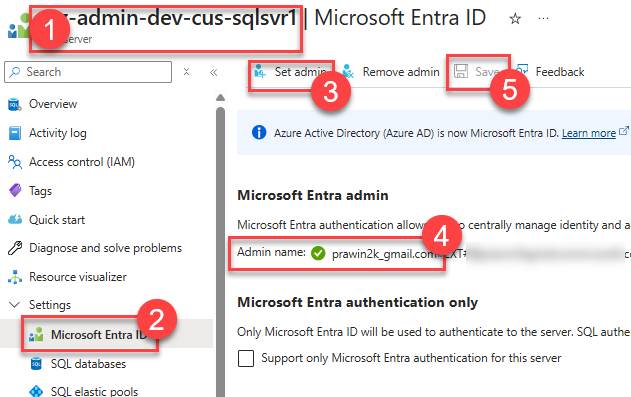
Two important clarifications at the server level:
- No Azure RBAC role is required on the SQL resource. Managed identity access to SQL data is granted inside the database (data plane), not through Azure role assignments (control plane). Do not waste time assigning “SQL DB Contributor” – it does nothing for query access.
- Networking still applies. Managed identity replaces the credential, not the firewall. Ensure “Allow Azure services and resources to access this server” is enabled, or configure the appropriate VNet integration / private endpoint.
Step 3: Create the Contained Database User and Grant Roles
Connect to the target database (not master) as the Entra admin – for example, using the Query Editor in the Azure Portal or SQL Server Management Studio with Entra authentication – and run:
CREATE USER [wz-admin-dev-cus-uami1] FROM EXTERNAL PROVIDER; ALTER ROLE db_datareader ADD MEMBER [wz-admin-dev-cus-uami1];ALTER ROLE db_datawriter ADD MEMBER [wz-admin-dev-cus-uami1]; -- Only if the app calls stored procedures:GRANT EXECUTE TO [wz-admin-dev-cus-uami1];
Three details matter here:
- The name in brackets is the UAMI display name exactly as it appears in Entra ID – not the client ID, not the object ID.
- Run this in the application database, not master. A user created in master will not have access to your app database. This is one of the most common mistakes.
- Grant least privilege. db_datareader and db_datawriter cover typical CRUD APIs. Only add db_ddladmin if the app runs schema migrations (for example, Alembic). Avoid db_owner in production.
Step 4: Code Changes in FastAPI with pyodbc
The good news: with ODBC Driver 18, the code change is minimal. The driver handles the entire token acquisition flow when you specify ActiveDirectoryMsi authentication.
import osimport pyodbcfrom fastapi import FastAPI app = FastAPI() CONN_STR = ( "Driver={ODBC Driver 18 for SQL Server};" "Server=tcp:contoso-sql.database.windows.net,1433;" "Database=contosodb;" "Authentication=ActiveDirectoryMsi;" f"UID={os.environ['AZURE_CLIENT_ID']};" "Encrypt=yes;" "TrustServerCertificate=no;") app.get("/products")def get_products(): with pyodbc.connect(CONN_STR) as conn: cursor = conn.cursor() cursor.execute("SELECT TOP 10 Id, Name FROM Products") return [{"id": r.Id, "name": r.Name} for r in cursor.fetchall()]
That is the entire change. No azure-identity package, no token plumbing, no struct packing. The ODBC driver talks to the App Service managed identity endpoint, obtains a token for https://database.windows.net, and presents it to SQL – all transparently, on every connection.
Why UID Is Mandatory for a UAMI
With a system-assigned identity, Authentication=ActiveDirectoryMsi alone is enough – there is only one identity, so the driver knows what to use. With a user-assigned identity, an App Service can carry multiple identities simultaneously. The UID=<client-id> parameter tells the driver which identity to request a token for. Omit it, and the driver falls back to the system-assigned identity – which either does not exist or has no SQL permissions – and the connection fails with a login error that looks nothing like the actual root cause.
Reminder: The Driver Must Exist in the Container
As we covered in the earlier article on running Python APIs on App Service Linux, the ODBC Driver 18 for SQL Server is not persisted if you install it manually inside the container. Use a startup.sh script or a custom container image so the driver survives restarts. Managed identity authentication rides on top of the same driver – no driver, no connection, regardless of identity.
Step 5: App Settings Changes
Only two things change in App Service configuration:
az webapp config appsettings set ^ --resource-group rg-contoso ^ --name app-contoso-api ^ --settings AZURE_CLIENT_ID=<uami-client-id>
- AZURE_CLIENT_ID – holds the UAMI client ID. This is a convention, not a platform requirement, but it keeps the identity out of your code and it is the exact variable that DefaultAzureCredential looks for.
- Your connection string setting – update it to the new passwordless format and delete the old UID/PWD version. If the old string remains anywhere, you have not actually removed the secret.
There is nothing else to add. App Service injects the identity endpoint variables (IDENTITY_ENDPOINT, IDENTITY_HEADER) automatically the moment an identity is assigned – you never set these yourself.
| App Settings | Only AZURE_CLIENT_ID and the updated connection string. Identity endpoints are injected by the platform automatically. |
| Firewall | Managed identity replaces credentials, not networking. Azure services access or private endpoints must still be configured. |
Conclusion
Moving from SQL authentication to a user-assigned managed identity is a five-step exercise:
- Create the User Assigned Managed Identity and assign the identity to the App Service Web App.
- In the SQL Server, set the Entra admin.
- In the Azure SQL Database, create the contained database user with the appropriate roles (follow Least privileged access rule)
- Update the Connection to include Authentication=ActiveDirectoryMsi with the UAMI client ID to your pyodbc connection string.
- Update App Settings to include the Managed Identity’s Client ID in AZURE_CLIENT_ID setting.
Discover more from Praveen Kumar Sreeram's Blog
Subscribe to get the latest posts sent to your email.
