Please go through the following articles to learn more about Storage Account.
- Azure Storage – Basics
- Azure Resource Manage Template: Create A Storage Account Using Blank Template
- Create a Storage Account and learn how to access It Programmatically
- Azure Storage – Creating Blob Container Using Storage Client Library
- Azure Storage Account Why Two Access Keys
- Azure Storage Account – Create Block Blob Programmatically using C#.Net
- Azure – Storage Account – Create a CDN Profile.
In the above articles, we have learnt about Storage Account and Content Delivery Network (CDN). We have also created an Azure CDN Profile. In this article, we will learn the following.
- Create a CDN End Point to an existing CDN Profile
- Associate a Storage Account to a CDN End Point
Navigate to Azure Management Portal and select the CDN Profile as shown below.

Currently, there are no CDN Endpoints. Let’s create one using the button Endpoint as shown in the above screen capture.
Clicking on the Endpoint button will take us to the Add an Endpoint blade as shown below.
| File Name | Description |
| Name | Name of the End Point. It should be unique |
| Origin type | What Azure Service you would like to associate the CDN for. As of now, below are the available options
1. Storage |
| Origin Hostname | Depending on the Origin Type, the options in this dropdown change. For Ex: If we select Storage, then automatically, all your Storage Accounts would be displayed. |
| Origin Path | If you want the current end point to pull only the assets of a specific folder then provide a path. If you want to have the CDN End point retrieve all your contents of your Storage Account, then leave this input box empty. |
Below is the screen capture of the Add an Endpoint screen.
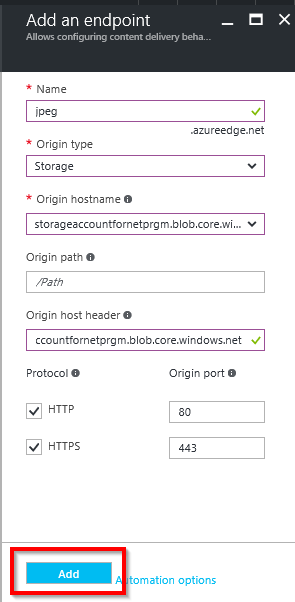
Clicking on Add button will create the CDN End Point as shown below.

If you remember, in one of our previous articles Azure Storage Account – Create Block Blob Programmatically using C#.Net, we have created a jpg file with the following URL.
- URL taken from Storage Account – https://storageaccountfornetprgm.blob.core.windows.net/images/jpegs/Azure.jpg
- URL from CDN End Point – https://jpeg.azureedge.net/images/jpegs/azure.jpg
Let’s navigate to the image from the CDN End Point.

We have accessed the image from the CDN endpoint as shown above.
Note: You can only cache the assets to a CND endpoint only if they are publicly accessible.
Summary:
In this article, we have learnt the following.
- How to create a CDN End Point.
- Access the assets from the CDN End point.
Hope you enjoyed reading the article. Your feedback is appreciated.
Do you like this article? If you want to get more updates about these kind of articles, you can join my Learning Groups
Discover more from Praveen Kumar Sreeram's Blog
Subscribe to get the latest posts sent to your email.
