
The Problem This Lab Solves
Most tutorials on container images start with “first, install Docker Desktop.” That single step creates friction — OS level issues, installation issues, version mismatches across team machines, and builds that work locally but break in CI.
ACR Quick Tasks eliminates all of that. You write a Dockerfile, run one CLI command, and Azure builds and pushes the image entirely in the cloud. No Docker. No local container runtime. No inconsistency.
This is Lab 1 of the ACR Tasks series. By the end, you will have a container image sitting in Azure Container Registry — built entirely without Docker Desktop on your machine.
What You Need Before Starting
- Azure CLI installed → https://learn.microsoft.com/en-us/cli/azure/install-azure-cli
- An active Azure subscription
- A terminal (PowerShell, Command Prompt, or VS Code terminal)
- A text editor to create the Dockerfile
That is it. No Docker Desktop.
Step 1 — Login and Set Up
Open your terminal and sign in to Azure:
| az login |
A browser window opens. Sign in with your Azure account. Once done, set your active subscription:
| az account set –subscription “Your Subscription Name” |
Then create a resource group to hold everything for this lab:
| az group create \ –name rg-acr-lab \ –location centralus |
Step 2 — Create the Azure Container Registry
Run this command to create your registry. The name must be globally unique and alphanumeric only:
| az acr create \ –resource-group rg-acr-lab \ –name acracrtaskslab \ –sku Basic |
Once it completes, go to the Azure Portal → search Container Registries → click your registry. You will see the Overview page confirming the registry is live.
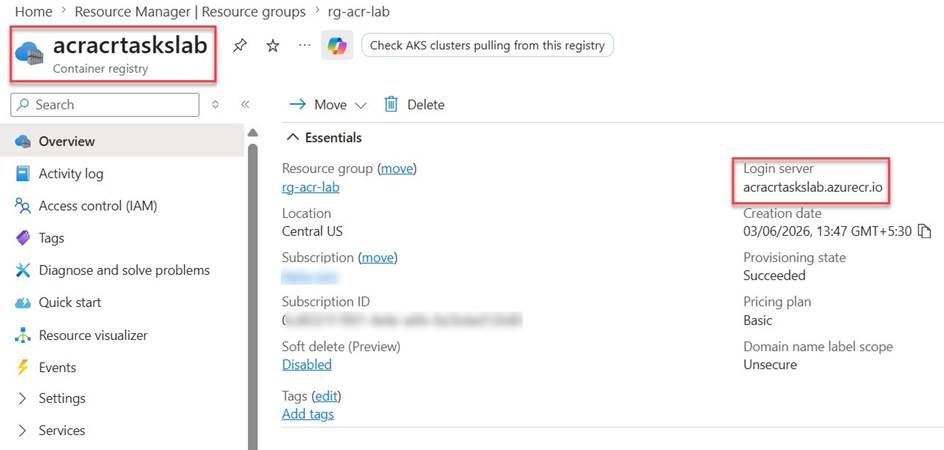
Screenshot 1: ACR registry created successfully — Overview shows registry name, login server (acracrtaskslab.azurecr.io), and Provisioning state: Succeeded
Two things to note on this screen:
- Registry name: acracrtaskslab — this is what you will reference in every CLI command
- Login server: acracrtaskslab.azurecr.io — the fully qualified domain your image tags will use
- Provisioning state: Succeeded — confirms the registry is ready
- Pricing plan: Basic — sufficient for labs and development workloads
Step 3 — Create the Dockerfile
On your local machine, create a new folder and navigate into it:
| mkdir acr-quicktask-lab cd acr-quicktask-lab |
Create a file named Dockerfile (no extension) and add this content:
| FROM python:3.11-slim WORKDIR /app RUN echo “print(‘Hello from ACR Quick Task!’)” > app.py CMD [“python”, “app.py”] |
This is an intentionally minimal Python container. The focus of this lab is the build pipeline, not the application. Your folder structure should look like this:
| acr-quicktask-lab/ └── Dockerfile |
Step 4 — Run the ACR Quick Task
This is the command that does everything — build and push — entirely in Azure. Make sure you are inside the acr-quicktask-lab folder, then run:
| az acr build \ –registry acracrtaskslab \ –image quicktask-demo:v1 \ . |
The . at the end tells the CLI to use your current directory as the build context. Azure compresses it, uploads it to a temporary build agent, executes the Dockerfile, and pushes the resulting image directly to your registry.
Watch the terminal — the entire Docker build log streams back to you in real time.
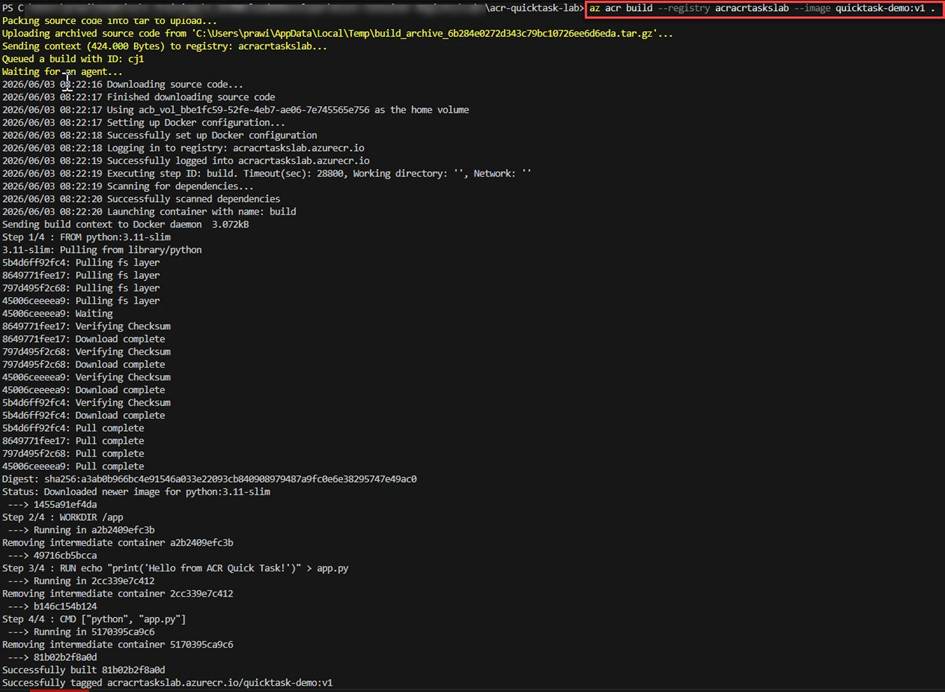
Screenshot 2: az acr build running — build context uploaded, cloud agent spun up, all Dockerfile steps executed in Azure, image tagged and pushed to the registry
Walk through what you see in the terminal:
- Packing source code into tar to upload… — your local folder is compressed and sent to Azure
- Queued a build with ID: cj1 — Azure assigned a Run ID. Every build gets one.
- Waiting for an agent… — Azure is spinning up a temporary build agent in the cloud
- Step 1/4 : FROM python:3.11-slim — Docker layer pulls begin on the Azure agent, not your machine
- Successfully built 81b02b2f8a0d — the image was built
- Successfully tagged acracrtaskslab.azurecr.io/quicktask-demo:v1 — image tagged with your registry login server
Notice that your machine did none of the heavy lifting. The Python base image was pulled on Azure’s infrastructure. The build ran on Azure’s infrastructure. The image never touched your local disk.
Step 5 — View the Task Run in the Portal
After the build completes, go to the Azure Portal → your registry → Tasks in the left menu → click the Runs tab.
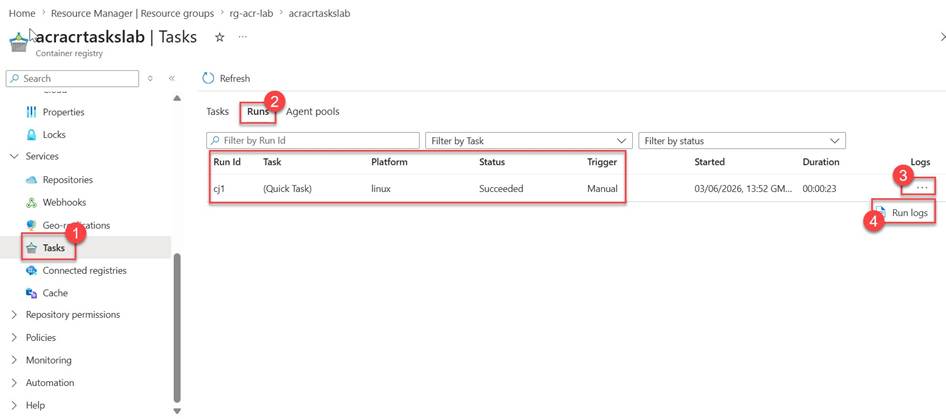
Screenshot 3: ACR Tasks → Runs tab — Run ID cj1 logged as a Quick Task, Status: Succeeded, Trigger: Manual, Duration: 23 seconds
Key columns to understand:
- Run Id: cj1 — matches exactly what the CLI printed when the build was queued
- Task: (Quick Task) — confirms this was an on-demand az acr build run, not a scheduled or triggered task
- Platform: linux — the build agent OS
- Status: Succeeded — the build and push completed without errors
- Trigger: Manual — you triggered this explicitly via the CLI
- Duration: 00:00:23 — 23 seconds from queue to pushed image
Click the … menu on the right → Run logs to see the full streaming log stored permanently in Azure for debugging and compliance.
Step 6 — Verify the Image in the Repository
Now confirm the image actually landed in the registry. In the left menu, click Repositories.

Screenshot 4: Repositories view — quicktask-demo repository visible with tag v1, SHA256 digest, and last modified timestamp confirming a successful push
Navigate through what you see:
- Repositories (left menu) — click here to see all images stored in this registry
- quicktask-demo — the repository name you specified with –image quicktask-demo:v1
- Tag v1 — the specific version you pushed, with its SHA256 digest and last modified timestamp
The SHA256 digest is the immutable fingerprint of this image. Any deployment referencing this digest is guaranteed to use exactly this build — not a different version, not a local variation. This is the consistency guarantee that ACR Tasks provides.
Step 7 — Verify via CLI
You can also confirm the image exists without using the portal:
| # List all repositories in the registry az acr repository list \ –name acracrtaskslab \ –output table # List tags for the specific repository az acr repository show-tags \ –name acracrtaskslab \ –repository quicktask-demo \ –output table |
Clean Up
To avoid ongoing charges, delete the resource group when you are done:
| az group delete \ –name rg-acr-lab \ –yes \ –no-wait |
Key Exam Takeaways for AI-200
| Concept | What to Remember |
| az acr build | Triggers a Quick Task — one-shot build and push with no local Docker |
| Build context | The . at the end uploads your local folder to Azure as the build source |
| Run ID | Every build gets a unique Run ID (e.g., cj1) — used for logs and audit trail |
| Trigger type | Quick Tasks show as Manual in the Runs tab |
| SHA256 digest | Immutable fingerprint of a built image — guarantees deployment consistency |
| No Docker required | The entire build runs on Azure’s managed infrastructure |
What You Proved in This Lab
You built and pushed a container image to Azure Container Registry without installing Docker Desktop. The build ran on Azure’s infrastructure, was logged with a Run ID, and produced an image with an immutable SHA256 digest. Every developer on your team running this same command against the same Dockerfile will produce the same result — regardless of their OS, local tools, or Docker version.
That is the core value proposition of ACR Quick Tasks, and exactly what the AI-200 exam expects you to understand.
| This article is part of the AI-200: Developing AI Cloud Solutions on Azure certification series. |
Do you like this article? If you want to get more updates about these kind of articles, you can join my Learning Groups
