
The Problem This Lab Solves
In Lab 1, you triggered a build manually by running az acr build from your terminal. That works for one-off tasks, but it is not how real teams operate. In a real development workflow, a build should start automatically the moment a developer pushes code — with no manual intervention required.
Azure Container Registry’s Automatically Triggered Tasks solve this. You define a task once, link it to a Git repository, and ACR watches the repo for commits. Every push fires the build automatically, produces a new image, and pushes it to your registry — without anyone running a single CLI command.
This is Lab 2 of the ACR Tasks series. You will connect ACR to an Azure DevOps Git repository and watch a container image build trigger automatically on every code push.
What You Need Before Starting
- Completed Lab 1 — your rg-acr-lab resource group and acracrtaskslab registry are still running
- Azure CLI installed and logged in
- An Azure DevOps organization — create free at https://dev.azure.com
- Git installed on your machine
Step 1 — Create an Azure DevOps Project and Repo
Go to https://dev.azure.com and sign in. Create a new project:
- Click + New project
- Project name: AI-200-ACRTasks
- Visibility: Private
- Click Create
Once created, click Repos in the left menu. You will see an empty repository with only a README.md file. Copy the Clone URL — you will need it in the next step.

Screenshot 1: Azure DevOps repo created — empty repository on the main branch with README.md, ready to receive the Dockerfile
Step 2 — Generate a Personal Access Token (PAT)
ACR Tasks needs a PAT to authenticate with Azure DevOps and register a webhook on your repository. This webhook is what fires the build when you push code.
In Azure DevOps, click your profile icon (top right) → Personal access tokens → + New Token:
- Name: acr-tasks-pat
- Organization: your org
- Expiration: 90 days
- Scopes: Custom defined → check Code → Read
- Click Create → copy the token immediately — you will not see it again
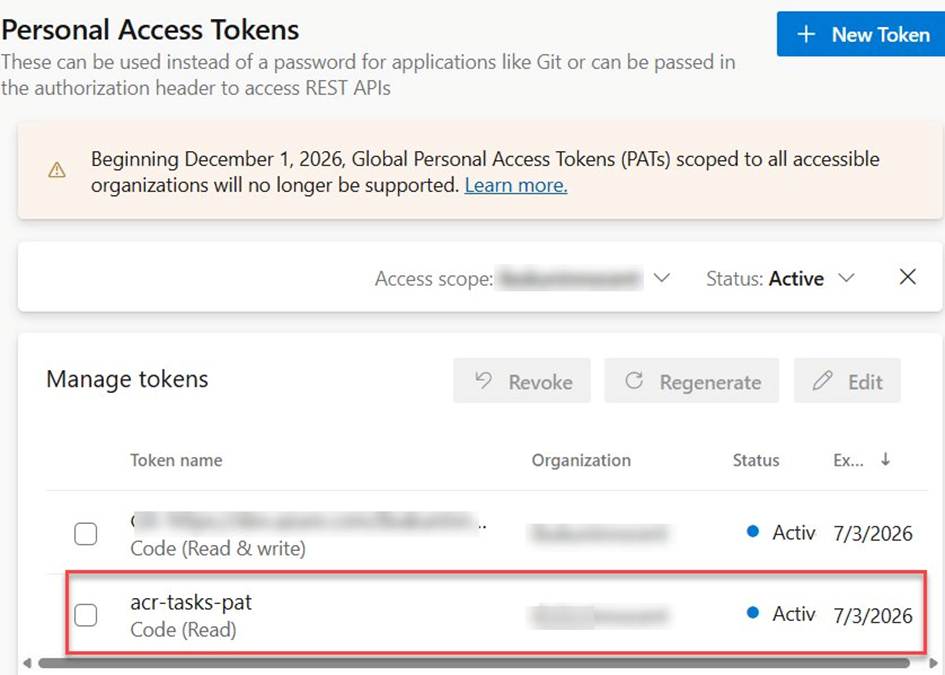
Screenshot 2: PAT created with name acr-tasks-pat — Code (Read) scope, Status: Active, valid until 7/3/2026
| ⚠ Important: Copy the PAT token value immediately after creation. Azure DevOps shows it only once. If you lose it, you will need to regenerate it and update the ACR task. |
Step 3 — Clone the Repo and Add a Dockerfile
Open PowerShell and clone your Azure DevOps repository:
| git clone https://dev.azure.com/yourorg/AI-200-ACRTasks/_git/AI-200-ACRTasks cd AI-200-ACRTasks |
Create a Dockerfile in that folder using VS Code or any text editor with this content:
| FROM python:3.11-slim WORKDIR /app RUN echo “print(‘Hello from Triggered ACR Task – v1!’)” > app.py CMD [“python”, “app.py”] |
Push the Dockerfile to Azure DevOps:
| git add . git commit -m “Initial Dockerfile” git push |
Step 4 — Create the Triggered ACR Task
This is the command that registers a permanent task in ACR and links it to your Azure DevOps repo. Run this in PowerShell:
| az acr task create ` –registry acracrtaskslab ` –name triggered-build ` –image ‘triggered-demo:{{.Run.ID}}’ ` –context ‘https://dev.azure.com/yourorg/AI-200-ACRTasks/_git/AI-200-ACRTasks#main’ ` –file Dockerfile ` –git-access-token <YOUR-PAT-HERE> |
| Parameter | Purpose |
| –name triggered-build | The task name — appears in the portal under Tasks |
| –image ‘triggered-demo:{{.Run.ID}}’ | Each build gets a unique tag based on the Run ID automatically |
| –context …#main | The Azure DevOps Git repo URL + branch to watch |
| –file Dockerfile | Which Dockerfile in the repo to build |
| –git-access-token | The PAT — allows ACR to register a webhook on the repo |
| ⚠ Always append #branchname to the context URL. Azure DevOps repos default to the main branch, but ACR Tasks defaults to watching master. If the branch name is wrong, the task is created successfully but the trigger will silently never fire. Always verify your default branch name in Azure DevOps Repos and match it in the context URL. |
When the command succeeds, you will see a JSON response confirming the task was created:
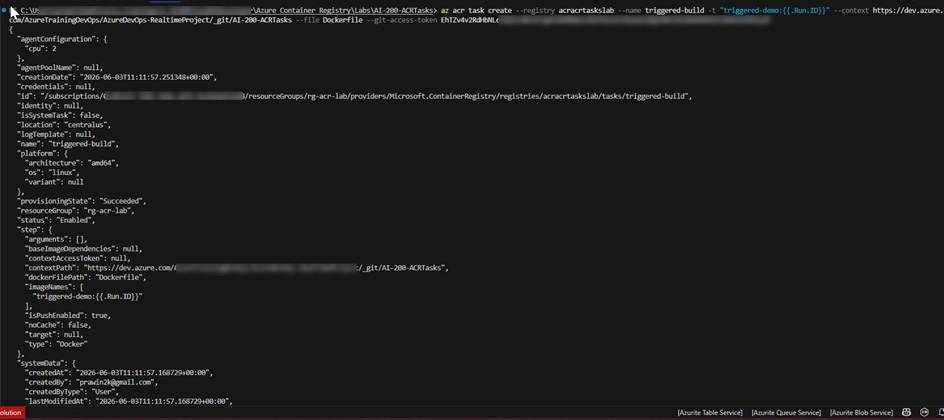
Screenshot 3: az acr task create succeeded — JSON response shows provisioningState: Succeeded, status: Enabled, imageNames: triggered-demo:{{.Run.ID}}, and the Azure DevOps context path
Step 5 — Verify the Task in the Portal
Go to Azure Portal → your registry (acracrtaskslab) → Tasks in the left menu → Tasks tab.
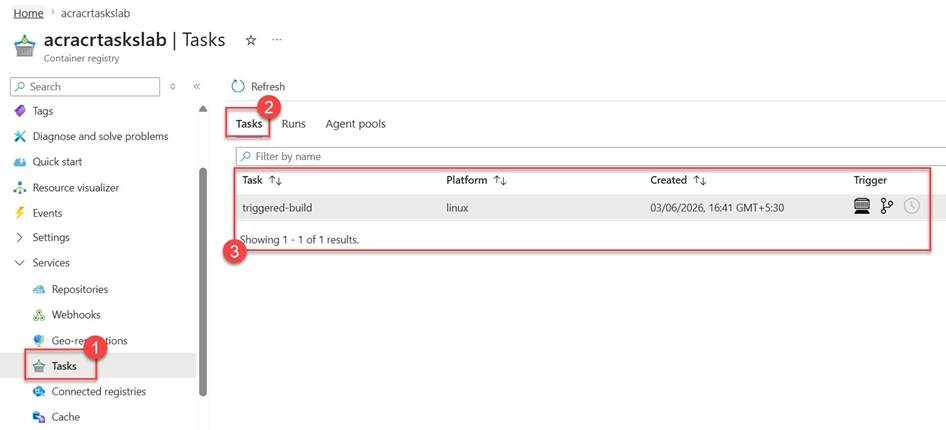
Screenshot 4: Tasks tab showing triggered-build — platform: linux, three trigger icons visible (manual, source code, timer), created 03/06/2026
You will see triggered-build listed with three trigger icons on the right side:
- First icon (manual trigger) — the task can also be run on demand
- Second icon (source code trigger) — this is the active one, watching your Azure DevOps repo for commits
- Third icon (timer trigger) — not configured in this lab, used for scheduled builds
Step 6 — Trigger the Task by Pushing a Code Change
Now simulate a real developer pushing new code. Make any change to the repo and push it:
| echo Updated > update.txt git add . git commit -m “Trigger ACR task build” git push |
Within 30–60 seconds, ACR detects the commit and automatically starts a build. No CLI command needed — the push event fires everything.
Step 7 — Watch the Automated Build Run in the Portal
Go to Azure Portal → your registry → Tasks → Runs tab. You will see a new run appear automatically.
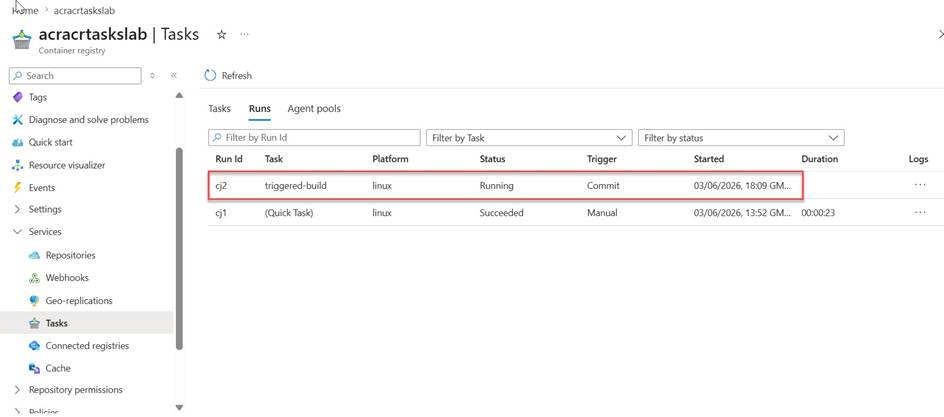
Screenshot 5: Runs tab showing two runs — cj2 triggered by a Commit (Status: Running) alongside cj1 from Lab 1 (Quick Task, Manual, Succeeded). The Trigger column clearly distinguishes the two task types.
The key difference to notice compared to Lab 1:
- Run ID: cj2 — the next sequential Run ID after the cj1 Quick Task from Lab 1
- Task: triggered-build — the named task definition that fired, not (Quick Task)
- Trigger: Commit — this build was started by a git push, not a manual CLI command
- Status: Running — the build is in progress on Azure’s cloud agent
This Trigger: Commit column is the proof that the automation is working. Nobody ran az acr build. The commit to Azure DevOps fired the task automatically.
Step 8 — Verify the Image in Repositories
Once the run shows Status: Succeeded, go to Repositories → click triggered-demo.
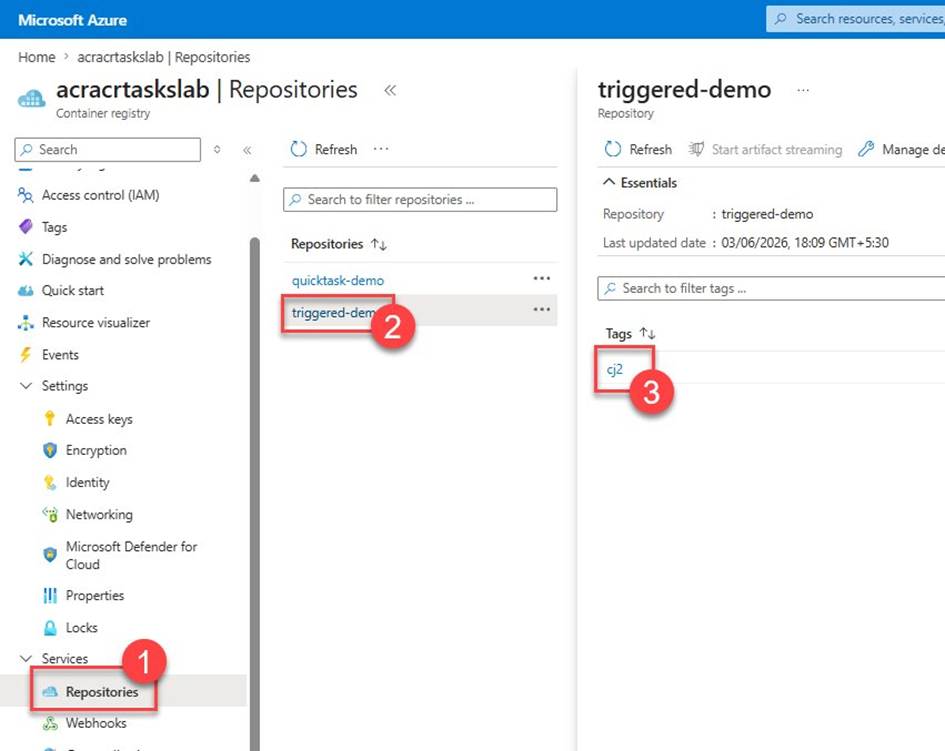
Screenshot 6: Repositories showing triggered-demo alongside quicktask-demo — triggered-demo has tag cj2 (matching the Run ID), confirming the automated build produced and pushed the image successfully
Notice two things here:
- Both quicktask-demo (from Lab 1) and triggered-demo (from this lab) now exist in the same registry
- Tag cj2 — the tag matches the Run ID exactly, because we used {{.Run.ID}} in the image name. Every automated build produces a unique, traceable tag automatically.
This is the real power of triggered tasks combined with Run ID tagging — every image is uniquely identified, fully traceable back to a specific commit, and never overwrites a previous build.
Verify via CLI
You can also confirm from the terminal:
| # List all tasks in the registry az acr task list ` –registry acracrtaskslab ` –output table # List tags for triggered-demo az acr repository show-tags ` –name acracrtaskslab ` –repository triggered-demo ` –output table # View logs for the latest run az acr task logs ` –registry acracrtaskslab ` –name triggered-build |
Clean Up (Optional)
To remove the task and registry when done:
| az acr task delete ` –registry acracrtaskslab ` –name triggered-build ` –yes az group delete ` –name rg-acr-lab ` –yes ` –no-wait |
Key Exam Takeaways for AI-200
| Concept | What to Remember |
| az acr task create | Creates a permanent task definition — unlike az acr build which is one-shot |
| –context …#main | Always append the branch name — ACR defaults to master, ADO defaults to main |
| {{.Run.ID}} | Built-in variable that tags each image with its unique Run ID automatically |
| Trigger: Commit | Confirms the build was fired by a git push, not a manual command |
| –git-access-token | PAT with Code Read scope — allows ACR to register a webhook on the repo |
| Task vs Quick Task | Named tasks persist and auto-trigger; Quick Tasks are one-off manual builds |
What You Proved in This Lab
You connected Azure Container Registry to an Azure DevOps Git repository and proved that a container image builds automatically on every code push — with no manual CLI commands required. The Run ID tagging strategy means every build is uniquely identified and fully traceable back to the commit that triggered it.
This is the foundation of a real cloud-native CI pipeline which ensures that every model update, every dependency change, and every code fix produces a new versioned image automatically — consistently, securely, and without relying on any developer’s local machine.
| This article is part of the AI-200: Developing AI Cloud Solutions on Azure certification series. |
Do you like this article? If you want to get more updates about these kind of articles, you can join my Learning Groups
