
In this article, we are going learn how to leverage Azure DevOps CLI to automate the process of adding multiple variables to a Variable Group with very low manual work.
Scenario
One of the most common requirements for a DevOps Engineer is to add variables to a Variable Group which are to be taken from an ExcelSheet with hundreds of variables. Below is how the excel looks like.

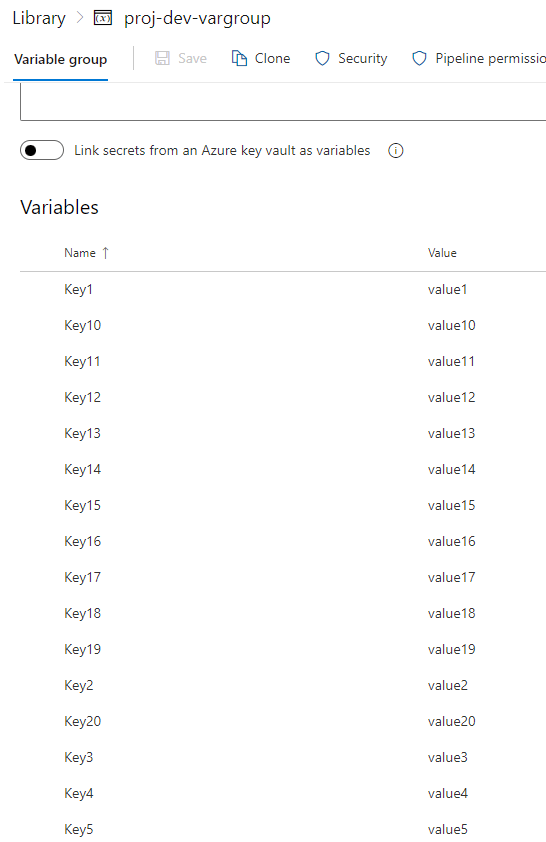
The ask is to add all of the above Key-Value pairs into a Variable Group which would look like below.

Note: It’s definitely very easy to copy/paste as there are just 20 Key-Value pairs in this scenario. However, think about a scenario where you need to repeat this for many Variable Groups for multiple project? It’s definitely a tedious job and there is a scope for human-error.
Solution
Instead of adding them directly from the Azure DevOps Portal, we will leverage the below Tools to automate the Process of automatically adding the Key-Value pairs without doing any manual Data-Entry job.
- Microsoft Excel
- Azure DevOps CLI + Azure CLI

Pre-requisites:
- Install Azure CLI – If not done already, Install latest version of Azure CLI from here
- Install Azure DevOps CLI extension using the below command.
- az extension add –name azure-devops
- Microsoft Excel
Let’s dive in and understand how to implement the automated solution.
Step0: Login to Azure DevOps from Command Line
Before we start issuing any commands, it’s mandatory to authenticate using Azure DevOps credentials.
Authenticate using Azure Account: If you are using same account for both Azure and Azure DevOps then you can use the below command to authenticate.
Az login
Authenticate using Azure DevOps PAT
You can also authenticate using a Personal Access Token (PAT) to authenticate. More details about it here
Once the Login is successful, you can set the default Organization name and Project name in which you want to run the commands. Let’s see that next.
Step1: Set Default Organization and Project
Set the default Organization and Project name using the below commands so that you don’t need worry about these details later when adding the Variables.
Set Default Organization
Run the below command to set the default Organization.
az devops configure -d organization=https://dev.azure.com/<OrganizationName>
Set Default Project
Run the below command to set the default Project.
az devops configure -d project=<ProjectName>
Step2: Create a Variable Group
Create a Variable Group from the Azure DevOps portal by navigating to Pipelines à Library and click on + Variable Group button as shown below.

Clicking on the + Variable Group opens up a new popup where you can create the new Variable Group as shown below.

Note: It’s mandatory to create at least one variable while creating the Variable Group. As shown above, a Testkey1 test variable is also created.
Once all the information is provided, click on Save button to Create the Variable Group.
Step3: Retrieve the Variable Group ID
As soon as you click on the Save button, the Variable Group will be created and the page will be refreshed which contains the Variable Group ID as shown below.

In my case, the Variable Group ID is 2 as shown in the above screenshot. This ID will be used in the Step4 and Step5 to dynamically create the Variables using the Azure DevOps CLI commands.
Step4: Create your first Test variable using Azure DevOps CLI Command
Let’s now run the Azure DevOps CLI command to create another Test Variable. Run the below command to create the Test Variable Testkey2
az pipelines variable-group variable create –group-id 2 –name “Testkey2” –value “Testvalue2”

You can review the results by refreshing the page in the Azure DevOps. The Variable Group should show the new Variable as shown in the below screen capture.

Step5: Generate Azure DevOps CLI commands dynamically using Excel Formula
In the previous step, we have created one single test command to create a variable in the Variable Group. Now, it’s time to generate individual commands using the favourite tool Excel.
Navigate to the excel sheet add another column and paste the below formula
=CONCAT(“az pipelines variable-group variable create –group-id 2 –name “””,C2,””” –value “””,D2,””””)
And, apply the formula to all the rows. Once you apply the formula to all the rows, it should look something like below.

Step6: Execute the Azure DevOps CLI commands
In the previous step, we generated all the commands in excel. Now, it’s time to run them. Copy the entire rows (exclude the header) of commands and paste all of them commands at once in the command prompt.
The command prompt will automatically execute one command at a time as shown below.

The above screenshots shown only the last few commands for brevity.
Step7: Review the output and delete test Variables.
Now, it’s time to review the results. Navigate to the Variable Group and refresh the page to view all the new 20 variables as shown below.
Don’t forget to delete the TestVariables.
Summary:
In this article, we have discussed about a simple Tip that helps a DevOps engineer to automate the process of creating the variables to an existing Variable Group. The same technique could be used to create a bulk of variables to the any number of Variables, Projects which save efforts.
Thanks for reading my article. If you have any better way to solve the problem, please feel free to post in comments.
Do you like this article? If you want to get more updates about these kind of articles, you can join my Learning Groups
Discover more from Praveen Kumar Sreeram's Blog
Subscribe to get the latest posts sent to your email.

Thank you for sharing details. Indeed, it is one of valuable information learnt today.
LikeLike
Waoo Awesome content posting,Many developers would agree that microsoft-azure is difficult and complex
whereas microsoft-azure is simple and so more productive,This site is so amazing.This sites gives good knowledge of microsoft-azure.
LikeLike