Prerequisites
- Visual Studio 2019 (or Visual Studio code)
- Create an Azure App Service
In this article we will learn the steps to integrate a .Net Core Web API with Application Insights which helps you to log all the application telemetry and gain insights about Failures and Performance with very low-code.
Let’s start.
Step1 – Create a new ASP.Net Core Web API Project
Create a new ASP.Net Core Web API using Visual Studio as shown below.

Once the application is created, it looks like this

Run the application to see if it’s running in the local machine by pressing F5. It should run in some port as shown below.

Step2 Download Microsoft.ApplicationInsights.AspNetCore Nuget package and configure Log Levels
Once the application is working n the local environment, let’s add the libraries that can be used to log the errors / telemetry to the Application Insights

Install the Microsofot.ApplicationInsights.AspNetCore nuget package shown above. Once you install, you can see the package added to the Project file as shown below.

In the appSettings.json add the Application Insights Log Category as shown below.

Build the application to see if everything is configured properly.
Step3 Enable Application Insights and configure Dependency Injection of ILogger interface
In this section, we will enable Application Insights in the ConfigureServices method of the Startup class as shown below.
public void ConfigureServices(IServiceCollection services)

{

services.AddControllers();

services.AddApplicationInsightsTelemetry();

}
In order to enable the Controllers to leverage Log Providers (in our case, Application Insights), we need to add ILogger interface to the Constructor as shown below.
private readonly ILogger _logger;
public WeatherForecastController(ILogger logger)
{
_logger = logger;
}
Step4 – Log the Errors, Information and Traces in your application code
Now, we can start logging the errors, information and any traces in your application code using _logger object reference as shown below.


Step5 Deployment of the Web API application to Azure App Service
As one of the Prerequisites was to create an Azure App Service – Web App, this section assumes that you have created an Azure App Service.
Let’s deploy the application to Azure App Service by right clicking on the Project and click on Publish and choose the appropriate options in the Publish window. If you have configured everything properly, you would see something as shown below.
Step6 – Create Application Insights and integrate with Azure App Service
The final step is to create an Application Insights instance and integrate it with the Azure App Service by following the below steps.
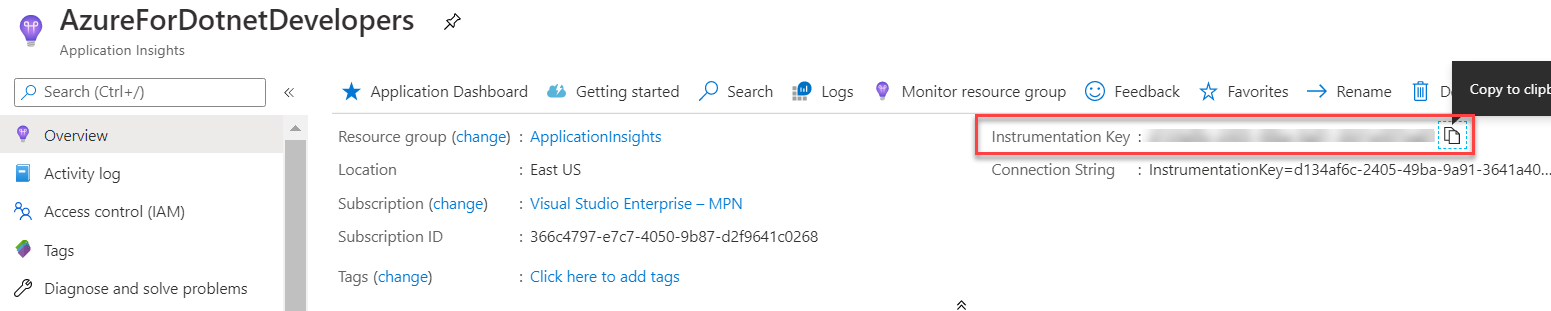
Create an Application Insights and copy the Instrumentation Key as shown below.

Navigate to the Configuration blade of the Azure App Service and add a new App Setting as shown below and click on Save to save the changes.
Tip: Ensure you create the Azure App Service and the Application Insights in the same Location. If not, if would lead to performance issues.
Finally, access the action method and after 2 minutes (sometimes up to 5 minutes), you should be able to look at the logs as shown below.

That’s it. We have learnt how to integrate Azure Application Insights with a .Net Core 3.1 application which is hosted in Azure App Service.
In the upcoming modules, we will learn more about Application Insights features.
Happy Learning.
Do you like this article? If you want to get more updates about these kind of articles, you can join my Learning Groups
Discover more from Praveen Kumar Sreeram's Blog
Subscribe to get the latest posts sent to your email.

2 comments