In this article, we will learn a new way of converting an existing Classic UI based pipeline into YAML pipeline.
Overview:
Azure Pipelines: Azure pipelines help us in automating the build and many other validation processes in a non-developer machines so that we can improved the quality of the Build.
Below are two different was in which you can configure Build Pipelines
- Classic UI Pipelines
- YAML Pipelines
Initially, Azure DevOps has only the Classic UI based pipelines. It had the below disadvantages.
- Multiple engineers working on the same pipelines was not easy
- Maintaining the versions of the Pipelines was almost not possible
- Submitting the Pipelines changes to the superior for a review was not possible
- Reusability was possible to some extent. However, executing those reusable components based on some rules was not possible.
With the support of YAML based pipelines, all of the above limitations is no more applicable now. However, Classic UI based pipelines provides us an easy approach for quickly authoring the pipelines especially for beginner’s, the Classic UI editor was a nice tool to start authoring the pipelines.
When you start working with YAML, initially you might not find it easy to work with but slowly once you understand how to get the YAML code from various different places, you will start feeling comfortable with YAML based pipelines too.
In this article, we will learn how easy it is to convert a Classic UI Pipeline into YAML based pipelines without authoring them from scratch.
Let’s start by authoring a Pipeline using Classic UI editor.
Author a Class UI Pipeline:
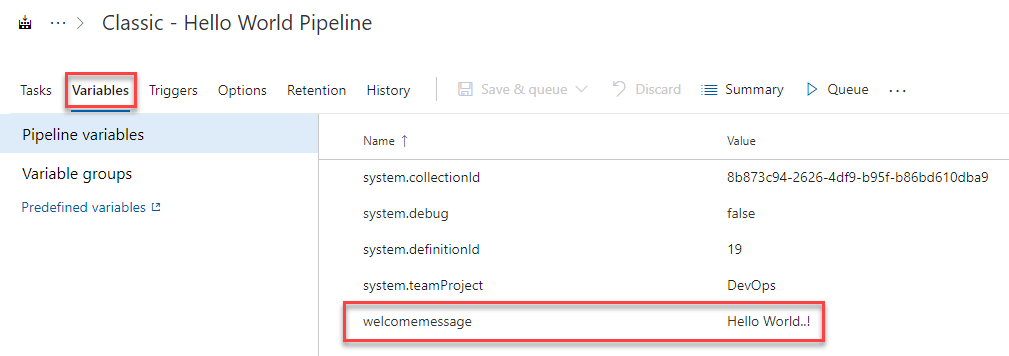
Below is a complex pipeline yet with simple tasks in it. As shown in the below screenshot, the below pipeline has two jobs with dependencies (Job2 is runs only after Job1 is complete).

Each of the Steps in the both the Jobs doesn’t do much except it outputs some steps using PowerShell.

Also, you might have noticed that the PowerShell uses a variable named $(welcomemessage) which is present in the variables section as shown in the below screenshot.
And, as shown in the below screenshot, Job2 has a dependency on Job1

Now, with all these functionalities, if you would like to convert this Class UI based pipelines, you have got a new option to download the complete YAML for the entire pipeline. Let’s learn how to do it.
Convert Class UI Pipeline to YAML Pipeline:
In this section, we will learn how to convert a Classic UI pipeline to YAML based pipeline. Navigate to the definition of the Build Pipeline by clicking on the Pipeline name. Once you click on the Pipeline name, you will be taken to the Pipeline definition page as shown below.

Now, click on the three ellipses as shown in the above screenshot which opens up a context menu as shown below.

Now, clicking on the Export to YAML button (shown above) will export the entire YAML file to your local machine.
Add the file to your repository as shown in the below screenshot.

The next step is to create a new Pipeline by clicking on the New Pipeline button and then follow the below steps.

Now, click on the Run button to execute the pipeline.

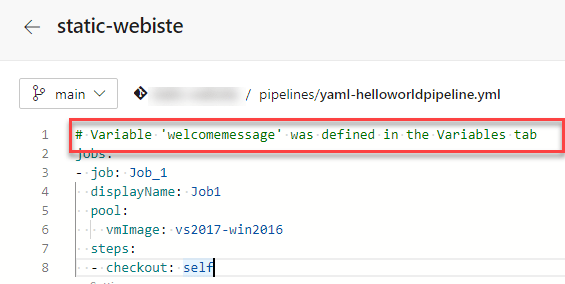
As shown in the above screenshot, the pipeline execution failed. Looking at the error message, it is clear than it doesn’t understand what welcomemessage is? It’s a variable that was created in Classes UI based Pipeline. That clearly means that the conversion to YAML deosn’t create all the variable. Moreover, if you go back to the YAML file, there is a comment (as shown below) that the variable welcomemessage was there in the variables tab.
We need to add that variable by clicking on the Variables button as shown below.

and add a new variable called welcomemessage as shown below.

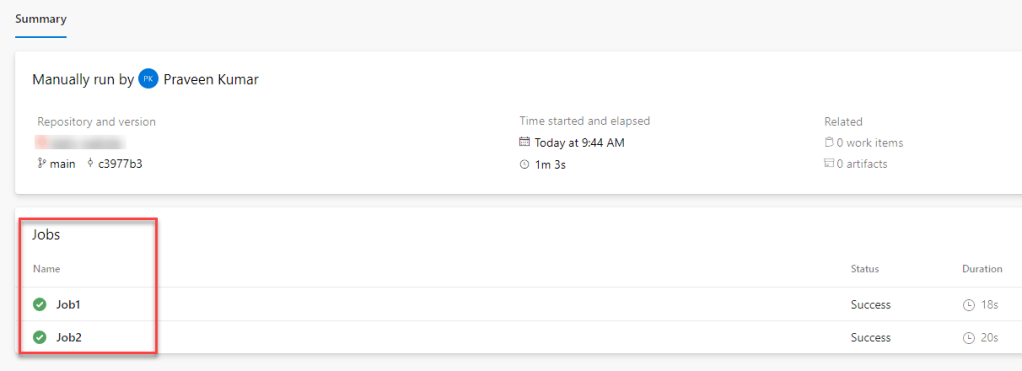
Let’s run the pipeline again and as shown in the below screenshot, it has successfully executed.
In this section, we have learnt how to convert Classis UI pipelines to YAML based pipeline.
Modify YAML Pipeline for new Requirements:
In a day-to-day operation, a Devops engineer is responsible to make changes to the existing pipeline. Let’s assume that the new requirement is to add a third task again using PowerShell in both the Jobs. In this section, we will learn how to add new tasks to the existing pipeline using the YAML Assistant
Now, navigate to the pipeline, place your cursor to where you would like to add the new task by following the below steps.

As shown in the below screenshot, you see a third step which executed some PowerShell script.

That’s it. We have learnt how to convert a Class UI based pipeline into YAML without knowing the basics of YAML.
Happy Learning.
For getting more updates you can join my WhatsApp group at Azure DevOps World WhatsApp group
Do you like this article? If you want to get more updates about these kind of articles, you can join my Learning Groups
Discover more from Praveen Kumar Sreeram's Blog
Subscribe to get the latest posts sent to your email.

What about release pipelines?
Can we convert them too?
LikeLike
Nope unfortunately
LikeLike
Hi,
Which one is the best in terms of performance wise?
LikeLike