Today, in this article, we will learn how to implement one of the very common scenarios of any application that gets data from an external source in the form of data feeds (ex: .csv, .json etc.).
Business Scenario:
DreamTech company receives the employee’s data feeds from its customers in the form of .csv files. All the customers place the .csv files in a separate Container in a Storage location. The CSV files contain the full dump of all the employees. Every week these files gets uploaded to the Storage location. The requirement is to load all the Employee data from the .csv files to the Azure SQL Database. All new Employee entries must be inserted into the Emp table and all existing Employee entries must be updated
Current Solution:
As of today, the Data Analyst has to manually place the files and run a program in a server.
Serverless Solution using Azure Data Factory:
In this article, we will develop a Serverless way of achieving the goal of loading the data from the .csv files and upserting (either inserts or updates) it into the database without writing any line of code.
Benefits of this solutions over legacy methods.
- Zero Code solution
- No Infrastructure management
- Automation scaling
- Out of the box monitoring solution
Services used.
- Azure Storage
- Azure Data Factory
- Linked Services
- DataSets
- DataFlows
- Activities
- GetMetaData Activity
- ForEach Activity
- DataFlow
- Alter Row Transformations
- Azure SQL Database
Solution Architecture – Below is the high-level architecture of the solution.
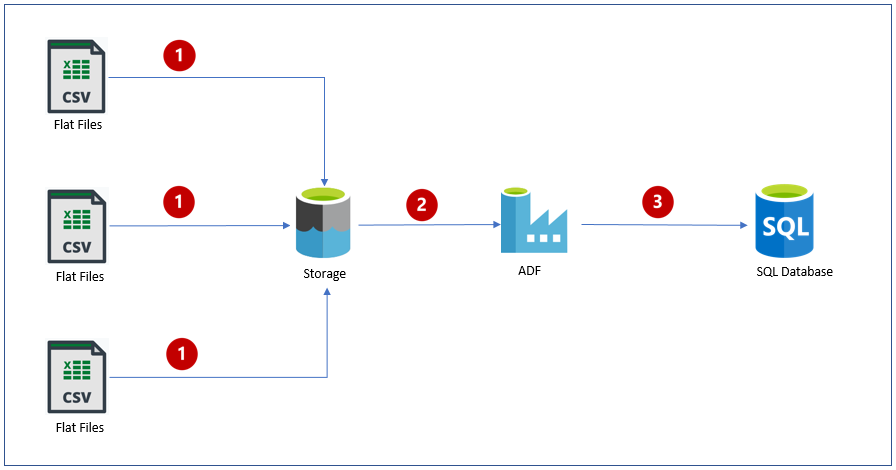
Steps depicted in the above arch diagram.
- Customers upload the employee data into Storage Account (as a Blob)
- The files will be extracted by the Azure Data Factory service
- Azure Data Factory UpSerts the employee data into an Azure SQL Database table.
Let’s start developing the solution by creating all the prerequisites as shown below.
- Create an Azure Storage Account
- Create a Data Factory Service
- Create an Azure SQL Database

Let’s now upload the employee data in the form of .csv file to a Storage Container as shown below.

Let’s create a new table in the SQL Database for storing the Employee information. Feel free to use the below script to create the Emp table.
CREATE TABLE dbo.EMP
(
Id varchar(100) NOT NULL,
Prefix varchar(255),
FirstName varchar(255),
MiddleInitial varchar(255),
LastName varchar(255),
Gender varchar(255),
EMail varchar(255),
FatherName varchar(255),
MotherName varchar(255),
MothersMaidenName varchar(255),
DateofBirth Date,
Age decimal,
Weight int,
Custid varchar(100)
)
GOCREATE CLUSTERED INDEX IX_emp_ID ON dbo.emp (Id);
Let’s start authoring the Azure Data Factory pipeline and also create all the required Azure Data Factory components.
Navigate to the Azure ADF portal by clicking on the Author & Monitor button in the Overview blade of Azure Data Factory Service.
In the Let’s get Started page of Azure Data Factory website, click on Create a pipeline button to create the pipeline. Before we start authoring the pipeline, we need to create the Linked Services for the following using the Azure Data Factory Management Hub section.
- Storage
- Azure SQL Database
As shown below, I have created the two Linked Services.

Let’s now create the Datasets for source and destination as shown below.
Source Dataset

Sink Dataset

Author the Azure Data Factory Pipeline
Let’s start authoring the ADF pipeline. The first step is to connect to the Storage account and retrieve all the Files available in the selected Blob Container Service.
Let’s use the Get MetaData activity by searching for “meta” and drag & drop the activity into the ADF canvas as shown below.

As shown in the above screen capture, while the Get Metadata activity is selected, click on the Dataset tab and then choose the Employee_DS_FTP dataset and then click on the +New button.
When you click on the +New button it shows up a drop down where you can select what kind of Metadata you would like to retrieve from the Source Dataset. As shown in the below screenshot, select Child Items in the dropdown of the Field list

Note: In case if you don’t see Child Items option in the Field List dropdown, then you would have selected a file while creating the Dataset. Make sure you don’t select any file for the Dataset.
Test the Get Metadata activity
Before, we move forward, let’s test the Get Metadata activity by clicking on the Debug button which (after a few seconds) opens up a new Output tab along with the status of the Debug activity as shown below.

As shown in the above screenshot, the Debug operation got succeeded. Let’s click on the Output button (you will see this only when you hover the mouse icon) to view the output of this Get Metadata activity as shown below in the form of JSON format.

As you can see in the above screenshot, there are two .csv files which are read from the Storage Container.
Our first activity Get Metadata is able to read the Files from the Storage Container as expected. Now that we got the list of the input file, we need to enumerate and process them one-by-one. In order to enumerate the list of items, we need to use another activity called ForEach activity. Let’s do that now.
Authoring ForEach Activity to enumerate the Files from the source.
Let’s create the ForEach activity by searching for it and Drag & Drop the same into the Pipeline Canvas as shown below.

The ForEach activity expects an input from the Get Metadata activity. So, in order to have these two activities communicate with each other, we need to link them. In order to do that, click on the small green box (available at the right-side edge of the Get Metadata box) and drag it and attach the arrow to the ForEach activity as shown below.

Once the Get Metadata and ForEach activities are linked, the ForEach activity can receive the inputs from the Get Metadata activity. We can configure the input by having the ForEach activity selected and then in the Setting tab(shown below), click on the Add Dynamic Content link as shown below.

When you click on the Add dynamic content, it opens up a popup where you need to choose the output of the Get Metadata activity as shown below.

Once you select the out of the Get Metadata activity, you would see something as shown below.

Testing the ForEach Activity
Now, we have two activities which are linked with each other. Unfortunately, it’s not possible to test an empty ForEach activity. So, in order to validate whether we have linked the activities properly, then we have to implement the following steps temporarily.
- Create a Pipeline scoped variable.
- Inside the ForEach activity, create an Append Variable
You can go through the article Azure Data Factory – Assign values to Pipeline Arrays in ForEach activity using Append Variable to understand how to implement the above two points.
As shown below, the ForEach activity executes based on the number of items that the Get MetaData activity and you can view the names of the files.

So far, we have been working on the Control flow activities. Now, we need to start working on building the activities that can work with data processing in such a way that for every employee record in the .csv file, we need to insert the record into the Table if the employee record doesn’t exist already. If the employee record exists already then we need to update the same. Basically, we need to implement the UPSERT functionality using Data Flow activities.
Let’s start authoring the Dataflow activity. The Data Flow activity must process each .csv file individually and update the database table.
Author the Dataflow
Create a new DataFlow by right clicking on the Data Flows menu item and then click on the New data flow button as shown below.

Once you click on the New data flow button, it opens up a new popup where you choose Mapping Data Flow and click OK button as shown below.

Mapping data flows are visually designed data transformations in Azure Data Factory. Data flows allow data engineers to develop graphical data transformation logic without writing code. The resulting data flows are executed as activities within Azure Data Factory pipelines that use scaled-out Apache Spark clusters. Data flow activities can be engaged via existing Data Factory scheduling, control, flow, and monitoring capabilities.
Source: https://docs.microsoft.com/en-us/azure/data-factory/concepts-data-flow-overview
Once you click Ok button, it opens up an Empty Data Flow canvas (I have named it as Upsert_Dataflow ) as shown below.

The Data Flow will be later embedded into ForEach activity. And, the ForEach activity will pass the name of the file that this Data Flow should take as a parameter and start doing the Data Transformations. So, let’s create a new Data Flow parameter named fileName as shown below.

Now, click on the Add Source button which adds a new Source and opens up the property window as shown below.

In the Source Type field, select Dataset and then in the Dataset field, select the Source dataset (in my case it was Employee_DS_FTP) that we have created.
The next step is to click on the Source Options tab and provide the variable name in the textbox of the Wildcard paths as shown in the below screenshot.

Now, click on the Projection tab which shows the fields that we have in the .csv file. That’s it, we are done with configuring the Source for the Data Flow.
Add Alter row Transformation
As the data flows through the source, we need to find a way that helps us in peforming the upsert. That’s where the Alter Row Transformation helps us. Add a new Transformation by clicking on the small ‘+’ icon as shown below.
Clicking on the ‘+’ icon in the above step, opens up the list of all transformations. Search for Alter and you will see the Alter Row transformation as shown in the below screen.

Once you select the Alter Row, a new item gets added as shown below.

In the Alter row setting tab, select the Incoming Stream (Source1 in my case) and then configure the Alter Row Transformation policies (in our example it’s just Upsert Policy) as shown in the below screen capture.

Add and Configure Sink Database
As of this writing, Data Flow – Alter Row Transformation supports only Databases (ex: SQL Database etc.) and Cosmos DB as the sink options. Let’s add the Sink by clicking on the ‘+’ icon which is immediate next to the Alter Row as shown below.
Now, a menu will open up where you need to click on Sink as shown below.

A new item will be added for the Sink as shown below.

Now, in the Dataset field, choose the Azure SQL destination dataset as shown in the above screen capture.
Click on the Setting tab and select Allow Upsert (this is Alter Row Transformation policy) check box in the Update Method field and then Id in the Key Columns field as shown below.

We are done with the authoring of the Data Flow as well. The next step is to integrate the DataFlow into the pipeline.
Navigate back to the Pipeline and go to ForEach activity and remove the AppendVariable activity that we have added for testing.
Integrate Dataflow in the Pipeline
Add a new activity named DataFlow into the ForEach activity canvas as shown below.

Once you add the activity, navigate to the Parameters section as shown below.

Now, we need to pass the value to the fileName variable of the Data Flow. Please follow the below steps to configure the value to the fileName variable.

Let’s publish the Pipeline to Azure Data Factory service by clicking on the Publish All button as shown below.

Once the Publish process is complete, click on the Add Trigger button and then on Trigger now button as shown below.

You can monitor the progress of the execution by navigating to the Monitor section and click on your pipeline as shown below.

Once the execution is complete, navigate to your database and view the data. If this is the first time, you are running the pipeline, then the table Emp would have all the records inserted.
Now, make the following changes to the source data and run the pipeline each time you make the change.
- Make some changes to the fields of the existing Employees.
- Add new Employees to the .csv files located in the Storage Account.
You would see both the updates and inserts will be saved to the database.
That’s it. We have learned the following.
- Creating an Azure Data Factory pipeline
- Creating an ADF – Data Flow
- Creating a Data Flow – Alter Row Transformation for upserting the data into Database without writing any line of code.
Do you like this article? If you want to get more updates about these kind of articles, you can join my Learning Groups
Discover more from Praveen Kumar Sreeram's Blog
Subscribe to get the latest posts sent to your email.

Very nice
LikeLike
Thank you!
LikeLike
Nice explanation and very useful.
LikeLike
Thanks for the wonderful explanation. I have one question though . Since we are not altering any row , why do we need the alter row Transformation, why not simply check the upset in the sink itself as you already did.
LikeLiked by 1 person
Alter row transformation does the trick of upsert. In Sink, we just configure wheather we allow upserts or not.
LikeLike
Thank you !
LikeLike
Hi Praveen , this is great stuff mate . Quick query – can row transformation data flow stage connect to a snowflake table .
LikeLike
Hi Praveen, It’s really useful content, Thank you. I have a question, How can we find out that how many rows inserted and updated by using upsert condition ?
LikeLike
Where can I find the CSV data to follow along with this process?
LikeLike