Introduction
In general, we store all the static assets like Images, JS Files, CSS Files, static documents like PDFs, Word Documents, Videos all in different folders within the Website root folder. The Web Server is responsible for storing and serving these static assets to the end user.
If we can leverage Azure Storage for storing all these static content it could dramatically improve the performance of the website as you are delegating the job of serving the assets to Azure storage. In those cases, the Web Server will have more room to server the dynamic content.
We can further improve the performance by integrating the Blob Storage account with CDN (Content Delivery Network) because CDN caches the static assets in the edge servers that are located to nearest possible location to the end user.
What is Content Delivery Network?
The Azure Content Delivery Network (CDN) caches static web content at strategically placed locations to provide maximum throughput for delivering content to users. The CDN offers developers a global solution for delivering high-bandwidth content by caching the content at physical nodes across the world
Below is the small diagram that shows how the CDN works.
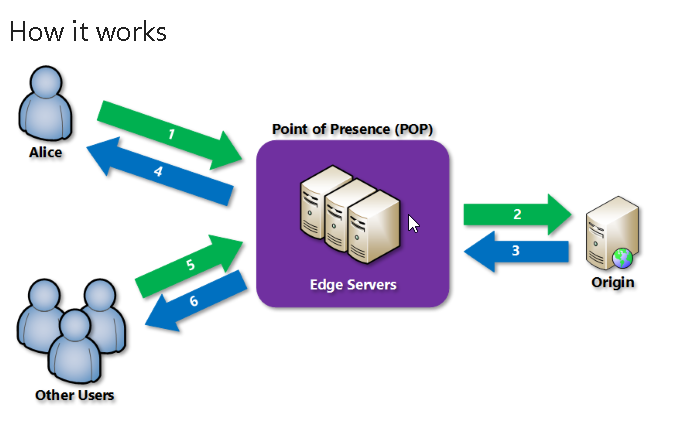
Ref: https://docs.microsoft.com/en-us/azure/cdn/cdn-overview
In this article we will learn how to create CDN.
Below are the steps for creating the CDN.
- Create a CDN profile – This is just a collection of CDN endpoints.
- As of this writing, each subscription can contain 8 CDN profiles.
- Create an End Point – Each end point could be associated with a Storage Account
- As of this writing, each profile can contain 10 CDN Endpoints.
Navigate to Azure Management Portal and select CDN as shown below.

Clicking on the CDN of the above screen capture will take you to the following CDN profile blade where you can provide all the details for creating the new CDN profile.

Note: Please note that unlike the other Azure services, CDN profiles are not associated with any specific location. The CDN related Edge Servers are spread across the globe and will keep expanding. You might be thinking why should we choose the Resource Group location in such case? All the meta data related to the CDN Profile and its End Points will be stored in a Data Center located in the Resource Group Location. The Resource Group Location will automatically be taken from the Storage Account location. You can review the same in the final screen capture of this article.
Clicking on the Pricing tier will take you to the following blade.

As of this writing Azure supports the following two CDN vendors
- Verizon
- Akamai
For this example, I have chosen S2 Standard Akamai pricing tier. Once you choose the pricing tier based on your requirement, click on Select button as shown in the above screen capture.
Below is how the Create CDN Profile blade looks after you choose the Pricing tier.

Click on Create button to create the CDN Profile. We have successfully create a CDN Profile as shown below.

In the next article, we will learn how to create and associate CDN endpoints to our Storage Accounts.
Summary: In this article, we have learnt the following
- What is CDN
- How CDN works
- Steps to create CDN
- Create a CDN Profile using Azure Management Portal
- Different CND pricing tiers
Hope you enjoyed reading the article. Your feedback is appreciated.
Do you like this article? If you want to get more updates about these kind of articles, you can join my Learning Groups

This website is very amazing for the different info in this blog that to this is very much interesting info in this blog
LikeLike
Appreciate the information here, it helped me a lot! Hope you can share other updates on how you have made this post outstanding
LikeLike